Fixing the overall color of an image in Gimp?

This is an archive of a topic from NESdev BBS, taken in mid-October 2019 before a server upgrade.
View original topic
Fixing the overall color of an image in Gimp?
by on (#217500)
It's a bit lame of me to ask you guys to help me on a project that has nothing to do with NESDev, especially after being so inactive here as of late, but it's for a graded school project, so... :lol:

Anyway, I had to do a stop motion project with my theatre class, and upon initially taking pictures, I forgot to take my camera's lighting off auto, so you have some pictures that are super saturated and yellow tinted, (luckily, all the bad lighting looks exactly the same) which is bad in of itself, but is even worse because I can't get it to work with Chroma Key in Sony Vegas which means the green screen randomly reappears in some shots.

Attachment:
Bad Picture.png
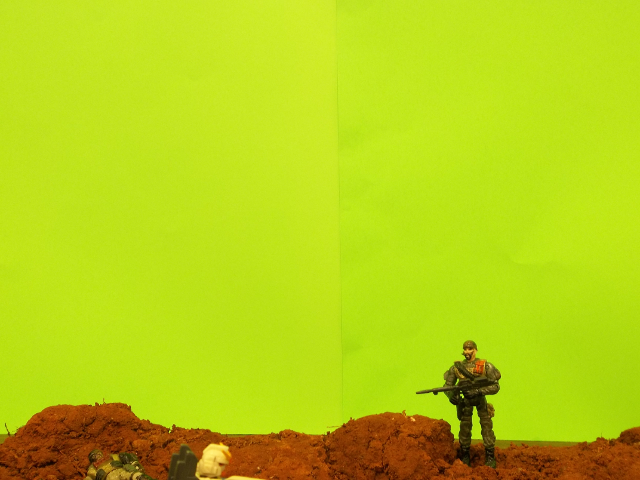
Bad Picture.png [ 419.2 KiB | Viewed 2646 times ]

Attachment:
Good Picture.png
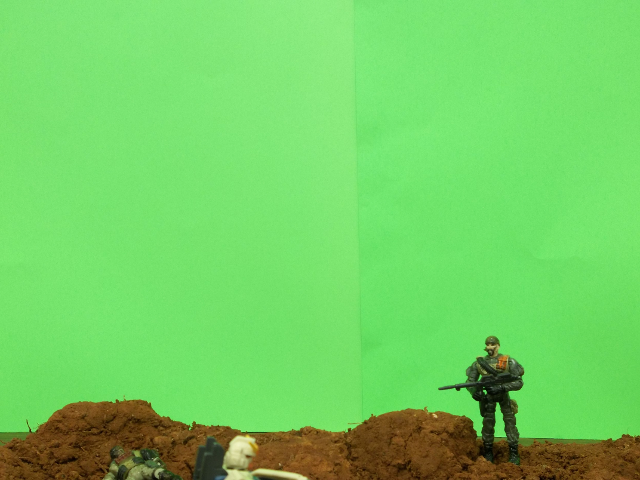
Good Picture.png [ 368.61 KiB | Viewed 2646 times ]

I've tried the Channel Mixer tool, but if I try and take away the red, it just looks really green, and then if I try and take away the green, the image just turns dark. I then tried to up the brightness, and then it looked really washed out, and then the saturation, and the colors were still off. :? I don't know if anyone has any advice, but I figured this is the most technically minded place on the internet I'm on.

Edit: It occurred to me that I should probably have both pictures in two separate files for others' convenience.
Re: Fixing the overall color of an image in Gimp?
by on (#217502)
White balance problems are usually fixed with Colors > Levels.
Re: Fixing the overall color of an image in Gimp?
by on (#217503)
I'm getting kinda okay results with Curves, adjusting blue and red mostly. You get more control than with Levels (and you can use a Levels setting as a starting point for curve adjustment). It's still hard to get everything to look right at the same time, though - getting the green screen perfect makes certain foreground features look too blue - or maybe I just don't know what I'm doing?
Re: Fixing the overall color of an image in Gimp?
by on (#217506)
Is there a "Color Balance" tool? I know the ancient Ulead Photoimpact has that. (edit: Gimp's "color balance" tool is nothing like what I was talking about)
Re: Fixing the overall color of an image in Gimp?
by on (#217507)
What I'd probably try is to create a program that identifies something that should be the same colour in all frames, and then does some colour transformation to make that match a reference frame. Doing them by hand in GIMP one at a time sounds like a real slog. (Then again, it might take hours and hours to write such a program. :P Maybe you could do it manually before then.)

GIMP has several tools for colour adjustment. Curves, histogram, etc. hue adjustment can also help in some cases, but really you want whatever can do the opposite of what your camera does for white balance. Maybe try something that's an exponential (gamma) curve on the 3 RGB channels separately?
Re: Fixing the overall color of an image in Gimp?
by on (#217510)
In Photoshop I'd use "color balance" if all colors in the image must be adjusted the same way, or "selective color" if some colors need to be changed while others remain the same.
Re: Fixing the overall color of an image in Gimp?
by on (#217511)
Yeah, Gimp's color balance tool is pretty mediocre.

93143 wrote:
or maybe I just don't know what I'm doing?

I thought the same thing too. I thought it was a bit weird how much the camera alters the color (It's like, a consumer Kodak camera from 2012. It's 14 megapixels though and has an overkill zoom feature, so I don't know...). I was really just hoping to universally adjust the red channel and it would fix it.

rainwarrior wrote:
What I'd probably try is to create a program that identifies something that should be the same colour in all frames, and then does some colour transformation to make that match a reference frame. Doing them by hand in GIMP one at a time sounds like a real slog. (Then again, it might take hours and hours to write such a program. Maybe you could do it manually before then.)

Luckily, the frames are either normal, or that harsh Gameboy yellow/green, and no in between, so I can just use Gimp's batch plugin, like I did to downsize the resolution (because I forgot to change that on the camera also).

I think I'll just have to use the color curves thing. Luckily, once I've solved it for one, I've solved it for all of them.
Re: Fixing the overall color of an image in Gimp?
by on (#217517)
if you have or can borrow a computer with photoshop installed, you can consult the attached project file for guidance.

Layer 0 is the good one used as reference, and "bad picture" is adjusted with all the smart filters (those are layered, non destructive image adjustments). I don't remember when photoshop introduced those, it might be a photoshop CC thing.

It's quick and dirty but should do the job. Had i had more time to spend, i'd isolate the greenscreen in a separate layer with any of the selection tools and then manipulate forground and greenscreen separately, but i'd consider these smart filters good enough for a school project or whenever something needs to be done quickly at work for that matter.

You can edit the smart filter options (and their blending) to taste, but preview is turned off while doing so.

Assuming your bad pictures all have the exact same problem, you can just copy the smart filter folder over to all of them and be done with it. Or adjust to taste.

(it's zipped because the forums doesn't accept psd project files)
Re: Fixing the overall color of an image in Gimp?
by on (#217519)
Luckily, some of the school computers have Photoshop installed, so I can use those. Thanks a million. :D
Re: Fixing the overall color of an image in Gimp?
by on (#217534)
Unrelated to this picture in particular but still related to my project; does anyone know how to move pictures/video/audio in Sony Vegas, and have it push everything after it? Normally, it just sort of "overlaps" it on the timeline, which just means the first thing will cut into the second's time, which is not very helpful. I've been having to click on an image, zoom out, click on the image all the way at the end while holding shift, and then drag it, which gets old fast. I don't even know why this isn't standard behavior in the program when extending the time of something.